I love everything about crafts. I have tried everything from scrapbooking, cardmaking, sewing, drawing, painting, knitting, crochet, dolls house making, etc. Basically you name it, I've probably tried it. I started this blog to display my numerous crafts, my inspiration and maybe a few tips on what I have learned. Thank you for visiting my blog and happy reading!

Thursday 31 October 2013

Happy Halloween

Hello everybody! Happy Halloween!
Wow, it feels like forever since I last posted on my blog. I'm really sorry that I haven't updated for so long.
Hopefully that will be no more, I'm going to try my best to update more regularly.

As you probably remember from one of my previous posts I have slowed down with my progress on my Grosvenor Hall due to financial reasons. Well you'll be pleased to know that I have slowly started making progress again and I should hopefully be posting an update for the living room in the next couple of weeks.

One of the projects I have managed to complete recently is a Halloween dress for my Deeanna Doll. It's not brilliant but considering I designed and hand-stitched in a day I'm really pleased with the results.
I used a dark pink satin with a spider web chiffon overlay to create this dress and black satin ribbon for the neck ties and belt. At the moment it fastens in the back with snap fasteners but I will probably redo this at some point with a mini zip to give a polished look.


I have also started a Deviantart account and I have posted several drawings/paintings on there that I have completed. If anyone is interested in looking at my drawings the link is: http://dolphingazer.deviantart.com/
Any comments would be really appreciated.

Sorry again for the delay in posts and thank you to everyone who views my blog and comments.
Take care X

Wednesday 24 July 2013

Dust Covers

Hello everyone, I hope you are all well. I usually post about my progress on my dolls house but I thought I would try posting something different. Recently I have been making dust covers for various machines that we own. Dust is usually one of the biggest problems when it comes to different machines breaking down.
So far I've made covers for my husband's PlayStation 3, xbox 360 and Apple iMac and for my Cricut Imagine and Cricut Expression. The reason for this post is I wanted to know if anyone would be interested in purchasing any of these covers. I can make them to order and I can do personal embroidery for them (names, brands, shapes, etc). The cost for the covers would depend on the individual requirements; I can make covers to specific sizes as well, all I would need is measurements. I can also make various die-cuts; I own at least 40 Cricut cartridges and numerous SVG files so I can make almost anything for anyone, again to personal requirements. I have been thinking about opening either a etsy, eBay or maybe even a Facebook shop to sell these, however I'm unsure whether I would get enough interest. I've posted some photos below showing what I have already made for myself and an example of the type of embroidery I can do (sorry for the poor quality). If anyone is interested please either comment or email me, I would love to hear your opinions.
Thank you again.
Take care x


Wednesday 3 July 2013

Hello

Hi everyone! I hope you are well. Unfortunately this is just a little hello instead of a full post.
As you are all very aware dolls houses are very expensive hobbies (when you want them to be grand and realistic) and can take a long time to complete. For me the cost is a little too much as I would like so many beautiful (and expensive!) things to get the first floor completed by August. I'm not saying I'm giving up completely on my dolls house; not in the least. I would just really like to save some money up so I can buy exactly what I want instead of just opting for the cheaper option to get it finished quicker. Therefore my blog is going to be limited in the way of dolls houses and it will probably focus on my other crafts while I am saving. I will try and update as frequent as possible, but I can't make any promises.
I hope you can understand my situation (as most of you are probably in the same boat) and you will be patient with me.
If anyone has any good ideas about creating beautiful realistic houses on a budget please, please, please let me know, I'm all ears.

Thanks again and take care x

Wednesday 5 June 2013

Living Room update


Hello everyone! I'm so sorry I haven't updated in nearly two months! Real life often gets in the way when all you want to do is your hobbies.
I have been busy with my Grosvenor, even though I haven't updated in so long. I've managed to finish my panelling for my living room and I glued the floor in place. All that's left for this room now is the ceiling, coving, light fixture, door and the chimney breast.
I'm still trying to decide what to do for my ceiling, I'm torn between leaving it plain with a large ceiling rose, ceiling paper or some type of moulding, any suggestions would be greatly appreciated.
Overall I'm very happy with my panelling. It was made using thick card, thin strips of balsa wood, skirting board and dado rail. I painted everything with white gesso as I didn't want the panelling to look too shiny. The piece in the far corner behind the chimney breast is removable so I can access the wire for the fireplace if I need to; I want to hide all the wires behind walls and under floors if possible.
My next step is probably to work on the ceiling and coving, I'm thinking probably an egg and dart design. The doors will have a white surround and the doors will probably be the same colour as the stairs in my hallway.
It feels sometimes like I will never complete this dolls house but I'm slowly making progress. My intention is to complete the first floor (living room, hall and kitchen) by August at the latest so I can start on the next floor; which will be a drawing room/library, hall and dining room. Wish me luck; I'm going to need it!
Any advice or constructive criticism would be well received.
Sorry again for the delay in updates and thank you for looking.
Take care x


Wednesday 10 April 2013

Grosvenor Hall Living room


Hi everyone! Hope you are all well. I know I haven't posted in nearly two weeks, again, and I'm really sorry. I've been rearranging my craft corner and it's taken a lot longer than expected and I'm still no where near finished. I'll have to remember to post a photo of my craft corner when it's finished.
Anyway back to my gorgeous Grosvenor Hall. Wallpapering time! Yeah! Or should I say boo, I hate wallpapering. I always end up with lumps and bumps or worse, ripping it. Luckily with the living room I wanted half wallpaper and half panelling so it made my job a little easier.
Before I even started wallpapering I had to think about the lighting. I really want lit fire baskets and I was concerned about how I was going to hide the wires. I finally decided that I would cut a section out of the chimney breast and make a small channel through the chimney breast towards the back of the house to thread the wire through, then I can hide the rest behind the skirting board/panelling as I had already done in my kitchen; still need to drill a hole in the back of the house for the wire to go through.
Once I had glued the chimney breast in position I marked in pencil on my walls how high I wanted to panelling to give me a guide on how much I needed to trim my wallpaper.


I trimmed the wallpaper down leaving about half a centimetre overlap on the bottom edge. Pasting the paper and the wall I carefully placed it in the room. I realised quite soon that I would probably not have enough wallpaper to finish the entire room so I decide to leave the chimney breast blank (I will probably add some sort of panelling later).


I overlapped the wallpaper on the chimney breast and just over the front edge which I will cover with a wood strip when the house is finished to prevent the wallpaper coming away from the wall at the edges.
As you can see in the pictures I still need to trim the hole for the doorway, which I will do when it's completely dry. Overlapping the wallpaper and matching the pattern wasn't as difficult as I first suspected and overall I am quite pleased with my wallpapering.


I temporarily placed the flooring and the fireplace in the room to get an overall effect; so far so good I think. The picture above is of the lights I would like to use for this room with matching wall lights. But before I buy them I still need to make the panelling, finish the chimney breast, secure the floor in place and possibly wallpaper the ceiling. I also still need to decide on a coving I like. Too many decisions, not enough time or money, typical.
I hope you like what I am doing, feel free to comment, positive and negative comments are all gratefully received as I find them very helpful. Thank you again for taking time to look at my progress.

Bye for now.

Monday 1 April 2013

Living room fireplace and spindles

Hello everyone.
Sorry for the delay, I can't believe I haven't posted in two weeks, bad me! I've just been really busy recently and I haven't had much time for my dolls house. I promise it won't happen again.

Anyway today I thought I would share with you my progress on the fireplace for my living room.
I listened to some suggestions from the lovely people on the dolls house emporium forum and I decided to use a marble effect for my fireplace. I have never painted a marble effect before so this was a real first for me. I started by painting my fireplace with a coat of white gesso and allowing it to dry before painting it with patches of different greys varying from a very light grey to almost black. With the darker colours I stippled the paint on to give it more of a texture.

white gesso
3rd coat of paint (white gesso)


2nd coat of paint (patches of grey)
As you can see from the pictures it did appear quite dark which was not the effect I wanted. So I gave the fireplace another coat of white gesso which brought it to a very light grey colour. All I need to do is add some veining and I think it will be complete. It's not brilliant and I know I can do better I just need to practice.

The next task I tackled was my spindles and the banisters. I used teak for the stairs, so I used this for the banisters. I used the picture of Mulvany and Rogers colonial dolls house stairs for my reference so I painted the spindles white.

I wanted to be able to paint the entire spindle in one go without it sticking to anything. I took a thick piece of card and I pushed metal pins through it to push the spindles on to. Once the spindles were secure on the pins I spray painted them with a Matt white.


I will probably wallpaper my living room before I finish making the stairs. I also need to make some panelling for the lower half of my living room and find  a suitable coving to give the room a elegant look. I'll probably install a chandelier in this room too but I'm not sure what kind yet.

Thank you again to the lovely people who view my blog and leave me comments. I do love hearing what you think it really does inspire me.

Monday 18 March 2013

Grosvenor Living room floor

Hello everyone, I hope you are all well. I would just like to say thank to everyone who has left me a lovely comment and to my new followers.
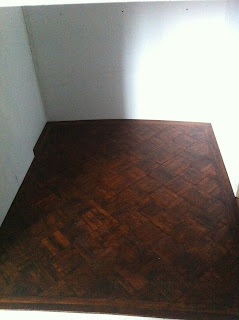
I finally finished my living room floor! It's taken about two weeks to finish but I think it's worth it. I decided that I wanted a parquet floor for my living room but in one colour. I had the wonderful task of cutting out hundreds of wood pieces, thank goodness for my mitre shears, they are perfect for cutting angles. I was originally going to position the pieces in straight rows but my husband suggested placing them at an angle. I was dubious at first but when I saw how it looked I absolutely loved it! I tried to draw a guide but it didn't really work so I ended up "winging it". All the pieces were glued down with RC modellers craft glue; which set quite quickly.


When I had finished glueing all the pieces it was time to sand it down but unfortunately my mini sander wasn't working so I had to do it all by hand! All I can say is ahhhhhhh!!!!! It took forever and I couldn't get it perfectly flat, I had to take a break for a bit otherwise it would have been thrown across the room. I finally managed to get it as flat as I could before starting to stain it. I wanted a lightish colour so that I could still see all my hard work. But me being me I didn't test the colour first and I stained all my floor dark oak which was way too dark. Oh fun, out comes the nitromors and the plastic gloves. After two coats of nitromors and sanding down in between I managed to get to almost the bare wood but there were still patches of dark colour. There was no way I could use a light colour now. In the end I ended up buying an antique pine stain; which I tested in a small place of my floor first.


Because of the dark oak that I had previously stained the floor with there are a few dark patches in places. I was a little worried about this at first but when I put the flooring in the house it didn't look too bad. I haven't glued the flooring down yet as I wanted to do the walls first. Hopefully once the wallpaper and furniture are in the room the patchy floor won't matter too much. Considering it is the first wood flooring I have ever done I don't think I've done too bad. I did struggle a bit with this so goodness knows how I'm going to do on my dining room floor; seeing as I would love to have a Versailles floor. I think I'll probably purchase the iron on flooring from Bromley Craft Products, it might make things a little easier for me.
I'm trying to decide between either panelling my living room or wallpapering it. I have got a gorgeous wallpaper from Karen's Dolls house Decor which I think would go lovely with the flooring, but I could leave it for a bedroom maybe, who knows, maybe.
I have chosen the fireplace for my living room, I'm either going to paint it white and paint the details in gold or maybe even give it a marble effect.


Well that's all for today, I hope you like what I'm doing. Any ideas or tips/techniques would be very much appreciated.
Thank you again to the lovely people who left comments and to my new followers I feel truly honoured that you are enjoying my blog.

Take care and bye for now.