I love everything about crafts. I have tried everything from scrapbooking, cardmaking, sewing, drawing, painting, knitting, crochet, dolls house making, etc. Basically you name it, I've probably tried it. I started this blog to display my numerous crafts, my inspiration and maybe a few tips on what I have learned. Thank you for visiting my blog and happy reading!

Saturday, 26 May 2012

2nd update on sister's prom dress


Here's the latest update on my sister's dress.

So far I have sewn the skirt and lining together to finish the hem.

I pinned the skirt to the bodice to check the length of the dress and to make sure the hem was level.


Next step the dreaded organza skirt overlay!
This material is awful to sew, it frays, snags, tears, rips, it's basically evil stuff but it does look gorgeous.


To start with I sewed all the seams on the skirt; remembering to leave the space for the zipper on the back pieces.


I decided to use a twin needle for all the seams on the overlay to reinforce them.
 
Once I had sewn all the seams I then finished them by folding over once then once again before pinning them in place.


Using my twin needle again I sewed close to the edge and through all the thicknesses of the organza to enclose the raw edge.


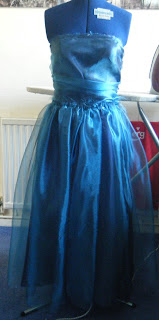
I pressed all the seams flat and then I gathered the overlay up so that it would fit before pinning it to the dress ready to sew.

It's starting to come together but there's still plenty of work to do before it's finished.

Friday, 18 May 2012

Update on sister's prom dress


Here I have pinned the pattern pieces to the fabric ready to cut out using a very sharp pair of fabric scissors, making sure I cut very close to the paper pattern.


With the overlay pattern pieces I cut them out about 1cm bigger then the paper pattern because this fabric frays very easily.


The front and back of the main dress. The fabric used is the navy blue crepe back satin.


The front, back and sides of the overlay sewn onto the main dress fabric.


Gathering the overlay fabric was a nightmare! It frays and snags with just the slighest touch so I had to be extremely careful with it. The photos don't do the colour of the dress justice, it looks too light in these pictures; whereas the fabric is a gorgeous dark teal colour.The back of the dress is only pinned in place at the moment because I still need to make the skirt and line the entire dress.

Friday, 4 May 2012

Look what arrived today!


My brand new Singer Futura XL-550 sewing/embroidery machine. My wonderful husband bought it for me as an early first wedding anniversary present.


 I am in love with this machine it has 215 built-in stitches including six automatic buttonholes, 125 built-in embroidery designs plus I can use the software included to create any design I want


I couldn't wait to get the embroidery unit set up . The six LED lights are really bright and light the work area up perfectly.


I decided to embroider my husband's name first. The hoop show is the smaller of the two, the other one is A4 size; although this machine does have multi-hoop cababilities.


This is the finished design along with my name as well using a basic font.


My husband is a Liverpool football supporter so I did a basic LFC logo. The original image was quite pixelated so the final embroidery wasn't that good, however it's still very good (better then what I can do by hand).

Work in Progress

I decided to share some photos of the work in progress of my sister's prom dress and what steps I take in making it from start to finish.


1. The first thing I do is I cut out the entire pattern at the biggest size - in this case size 20! My sister is tiny so she needs the smallest size which is a 12 and even then I will probably need to make it smaller.


2. Once I have cut out all the pattern pieces I select only the pieces I need for view B and I put the rest back in the envelope. Using a low setting I then iron the pattern pieces as flat as possible.


3.  I then trace the relevant size onto dot and cross paper, making sure that I transfer all the markings such as notches, dots and pattern information. I then go over all my pencil markings with a black pen so that the markings are clear. I iron the pieces flat and then I'm ready to start pinning onto my fabric.

My sister's prom dress

My sister has her prom near the end of June and I`m making her dress. Below is the pattern and the fabrics I am using. The pattern is Simplicity 3878, view B (minus the rosettes). I am using navy blue crepe back satin for the main part of the dress, anti-static navy blue lining and teal blue/black crystal organza for the overlay. Hopefully it will look gorgeous when it is finished. :-)